
Anita's piecing and quilting tutorials
A new year, a new house, a renewed blog, a new focus on my quilting. My plans are to show more "how to" posts about quilting.
Necktie quilt instructions one
UPDATE: There has been some confusion about washing the ties. When I originally wrote this post I was showing another quilt maker how I made quick quilts for homeless men. Homeless men don’t care about running colors or preserving the memory of the ties. They just want to be warm. I was using ties I had bought at a thrift store so preserving the ties was not important. If you do plan to wash your ties it should be done before they are taken apart.
These instructions are written for someone with at least a basic knowledge of sewing and sewing products. Understanding about the construction of a quilt is also helpful. If you are an absolute beginner please do not use treasured memory items to learn to sew. Find someone with sewing knowledge to help you.
Within several of these posts I talk about a “stabilizer” but some people call it an “interfacing”. I go into more depth about this product in another post.
I find myself adding more instruction posts as more questions are asked. Please go to the home page of this blog to find and read all of the posts before starting your necktie quilt.
****************************************************************
Before you can make a necktie quilt there are a few things you must have. Neckties of course. You can’t make a necktie quilt without the neckties. When you have gathered up your neckties you need to wash them in the hottest water you have available. Why? Because you want them to shrink or fade or come apart or whatever they are going to do before you spend all that time and effort making your quilt. You don’t want to do all that work only to have something happen the first time it’s washed.

Wash in hottest water available.
The ties that are going to cause problems will show in the washing process. Washing them creates a mess of tangled up ties. Don’t worry, the tangles will come apart easily, but wait until after you’ve dried them on a hot setting. Washing also means your finished quilt can be washed instead of taking to a dry cleaner. There will be those who differ on whether to wash or dry clean a neck tie quilt. It’s my personal opinion that dry cleaning quilts is expensive and risky and stinky.

Tangled mess after washing.
After the washing and drying you will want to take the ties apart and remove the inner stabilizer. Usually there is one thread holding a tie together. If you find that thread you can pull it out easily. When I take the ties apart I save everything. I save the padding fabric for making rugs. I save the labels for another craft that I’ll start someday when I have enough labels. I save the thread because it is a super strong thread. It makes great coat button sewing thread.

Taking ties apart
Neckties are made with fabric cut on a bias. This means the ties are stretchy and could ravel easily. Stretching and raveling is not good when making quilts. You need a stabilizer (also called interfacing) to tame and prevent stretching and raveling of the bias cut fabrics. I use Pellon brand iron on stabilizer. It must be the iron in type to work for quilts. Do not, do not, do not confuse the interfacing stabilizer with a glue product called wonder under or heat n bond. They are NOT stabilizers. The glue products usually come attached to a paper which prevents it from sticking to itself on the bolt.
What you need for a necktie quilt is the same product you would find inside the collar or cuffs of a button up shirt. It stabilizes a fabric but does not glue it together. I use the Pellon brand but there might be other brands out there somewhere. The Pellon has tiny dots of glue on one side only and does not have paper. If you are having trouble finding the stabilizer, look for interfacing OR look where machine embroidery supplies are sold.
I use the feather weight most often because it tames the fabric without adding a lot of weight to the quilt. Making quilts from clothing is my specialty. I make a lot of quilts from clothing so I buy stabilizer by the bolt. How much to buy for your own quilt? That will depend on which pattern you choose and which size you intend to make.

Pellon feather weight iron in stabilizer
The next thing you will need is a pattern. Many people are under the mistaken idea necktie quilts are made with neckties in their original wearable form. Not true, as you will see later in this post. The pattern I chose for this tutorial is a Dresden Plate. I chose it because the lady who emailed me for instructions liked the ones I had made before. There are hundreds, or possibly thousands, of Dresden Plate patterns out there.

The great thing about making quilts from neckties is that any pattern will work. Once the ties are taken apart it’s just fabric. They are no longer ties. Look at them as a pile of odd shaped fabric scraps instead of neckties. If you have a pile of scrap fabrics the pattern possibilities are endless. What would you do with a bunch of scrap fabrics? A string quilt? A nine patch? Applique? Or, a Dresden Plate?

Neckties taken apart
You may want to buy a template for cutting your pieces. You don’t have to buy one but it sure will make cutting the quilt pieces much easier. I have two Dresden Plate templates, a small and a large. I could have used either one but for speed I chose to use the smaller of the two. The templates come in different “degrees” and each size requires a different number of pieces (blades) to make the circle. If you want to use lots of ties then choose a template or pattern with narrower blades.

Plastic rotary cutting template rulers
So now you have your ties washed and taken apart and you have your pattern. It’s time for me to reveal the magic secret to making good necktie quilts. Drum roll please……… you cut the stabilizer into the wedge shapes before you iron it to the fabric. Why do I cut the stabilizer before ironing instead of after ironing to the ties? Because I’m frugal. I don’t like using more stabilizer than necessary because its expensive. Honestly it can be done either way. I’ve used it both ways. I prefer to cut the shapes first and ironing it to the ties which is what I did for this sample.
For my necktie sample quilt I decided to use the full length of the smaller ruler. It’s an eight inch ruler which makes a finished circle of 17 1/2 inches across. I cut an 8 inch wide strip of stabilizer and then cut the blades. If you plan to make a much larger plate for a much larger quilt then use a longer wedge ruler. Whether you plan a small plate or a larger plate the process is the same.

Cutting the stabilizer
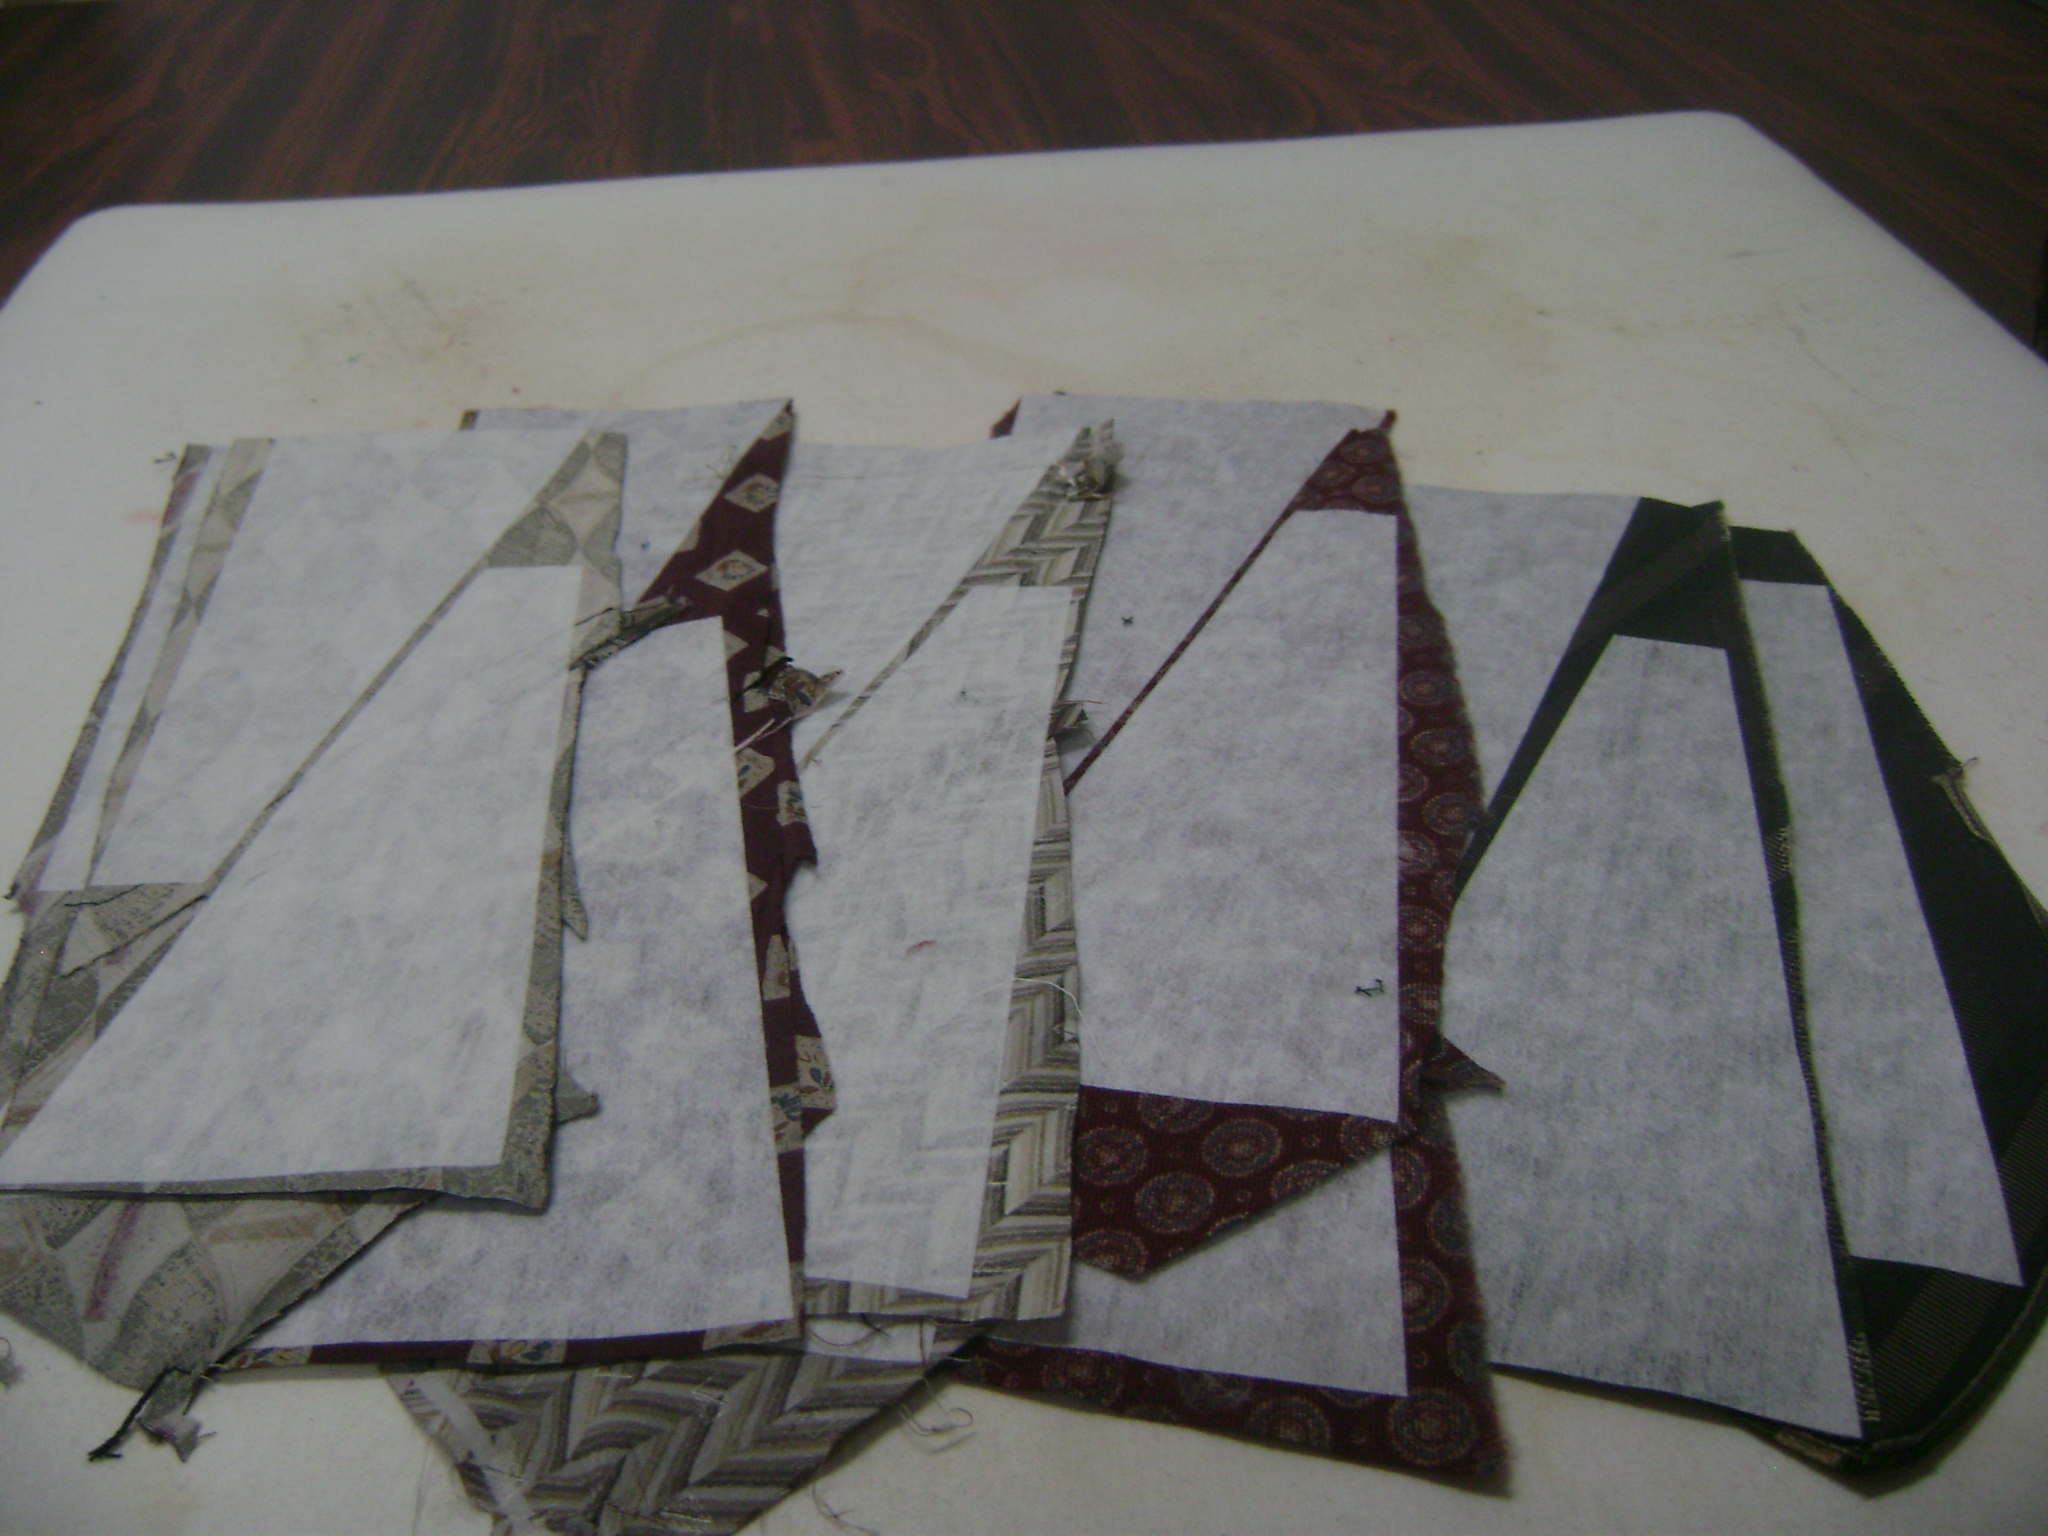
The next step for me is to iron the shapes to the back of the neckties. By cutting the stabilizer first, I can manipulate placement and get four blades each from the narrow end of five ties. Or twenty blades. This leaves the remaining fabric of the ties, the wider end, for making into other quilts. If you are planning to make a large plate you may be using about half the length of the tie for each blade.

Stabilizer ironed to back of neckties
See? Four of each color for a total of twenty. Simply trim along the sides of the stabilizer and you’re ready to start making your Dresden Plate.
I wanted to see how the fabrics look together so I lay them out. Drat, the photo looks washed out. Low batteries.

The first sewing step is to fold the wide end in half and sew across it. Like this. Use a 1/4 inch seam. I chain sew all the blade ends.

Sew across the wide end
Now cut them apart and clip a little tip off the side with the fold. Like this.

Clip off a dog ear
Fold them right sides out and press the blades flat. The seam inside the blade point is ironed open. The clipped off piece allows for a better point and creates less bulk. It does take a little manipulation to do that but is worth the effort. Be sure to keep the seam centered so your points stay even and not skewed to one side.

Four blades of five colors
Now it’s time to sew the blades together. Use a 1/4 inch seam again. Always start at the pointy end of the blades. If you have a slight difference in length, or your points are skewed, it will show at the center and not at the pointy end.

Sew the blades together with 1/4 inch seam
Sew two together. Sew two pairs together. Etc, until you have a full circle. I press the seams open to reduce bulk. I always iron each seam after it’s sewn. If my seams are not accurate or if anything else has happened it will be apparent as I iron each seam. I frog stitch and correct any error before going on. My plate has finished nice and flat. Everything is pressed nicely.

Press seams open as you go.
Now it’s time to cover the whole in the center. For this I use the necktie inside facing. This facing comes in really nice solid colors. Just right for making a Dresden plate center circle.

Colorful necktie facings
Use whatever way you make a circle. I found that a jar ring is just the right size for marking my circle.

Find something to mark a circle the correct size
I mark the circle on the stabilizer but do a “birthing” technique rather than iron for a raw edge.

Birthing a circle is when you sew the stabilizer to the fabric, right sides together, then turn it right side out (the birthing part), making sure the edges are even, and press. I use my thumbtack method for a perfect circle.

Sewing a perfect circle
When you have your circle made it goes in the center of your plate. That’s it. The plate is finished.

Now that the plate is finished you simply use your favorite way to applique and put it on a background fabric. If you would like to know how to draw your own template for the Dresden instead of buying a plastic one go here. Draw your own Dresden template.

I have my dads ties. He doesn’t have a lot maybe 20. Any ideas would be helpful.
Kathleen, once the ties are taken apart and ironed flat its just fabric again. Its surprising how much fabric is in one tie when flat again. You can make lots of different things with fabric. Do a search of reusing old ties and you’ll get thousands of ideas. I’m a quilter so I’d make quilts. A toy maker might make stuffed animals. A dress maker might make a jacket. Get the idea? If you think you would want to make a quilt there are string quilts, Dresden plate quilts, crazy quilts, or applique quilts.
I’m an experienced quilter, although I’ve never attempted to use silk ties. My husband has a friend who wants a bed quilt made from his beloved ties. Your instructions were exactly what I was looking for and I really appreciate your work. I have a couple of questions – how warm is a silk tie quilt? how heavy? And what kind of batting would you recommend using? I’m washing the ties today and will save the labels for you; please tell me where to send them.
Colleen Voet colleenvoet@gmail.com
For batting I personally use quilters dream cotton in the request weight. To guess at how heavy the quilt will be when finished, put all the ties and the batting and the backing into a bag and lift it. Your quilt will be slightly less. Because the tie interfacing will be gone and some fabric cut away as you piece. My address is Anita Estes 3718 Luken Drive Louisville KY 40216 My address is under the “may I have them button” on the side bar too.
Hi Anita,
I have been collecting silk ties for years so I can make a Dresden plate quilt. I was going to take my ties to the dry cleaners and beg for a discount as I know it is expensive. Your tutorial is the best I have seen.
Also, I have been saving labels for years. I am going to do something spectacular with them also. Do you have an idea yet? I have a Victorian crazy quilt and that is where I got the idea to save all my labels. I get them from coats and ties.
I am planning to put the labels into a crazy quilt IF I ever gather enough.
Me too. I too have been saving labels for years. It must be some sort of obsession about throwing out something perfectly good.
Hmm… could be I’m a border line hoarder. 🙂 Actually I plan to put mine into a crazy quilt IF I ever get enough of them. What do you plan to do with your labels?
I am going to make a silk quilt and use the labels as part of the design. My ties are actually all silk so my tags will be incorporated some how.